 Pin It
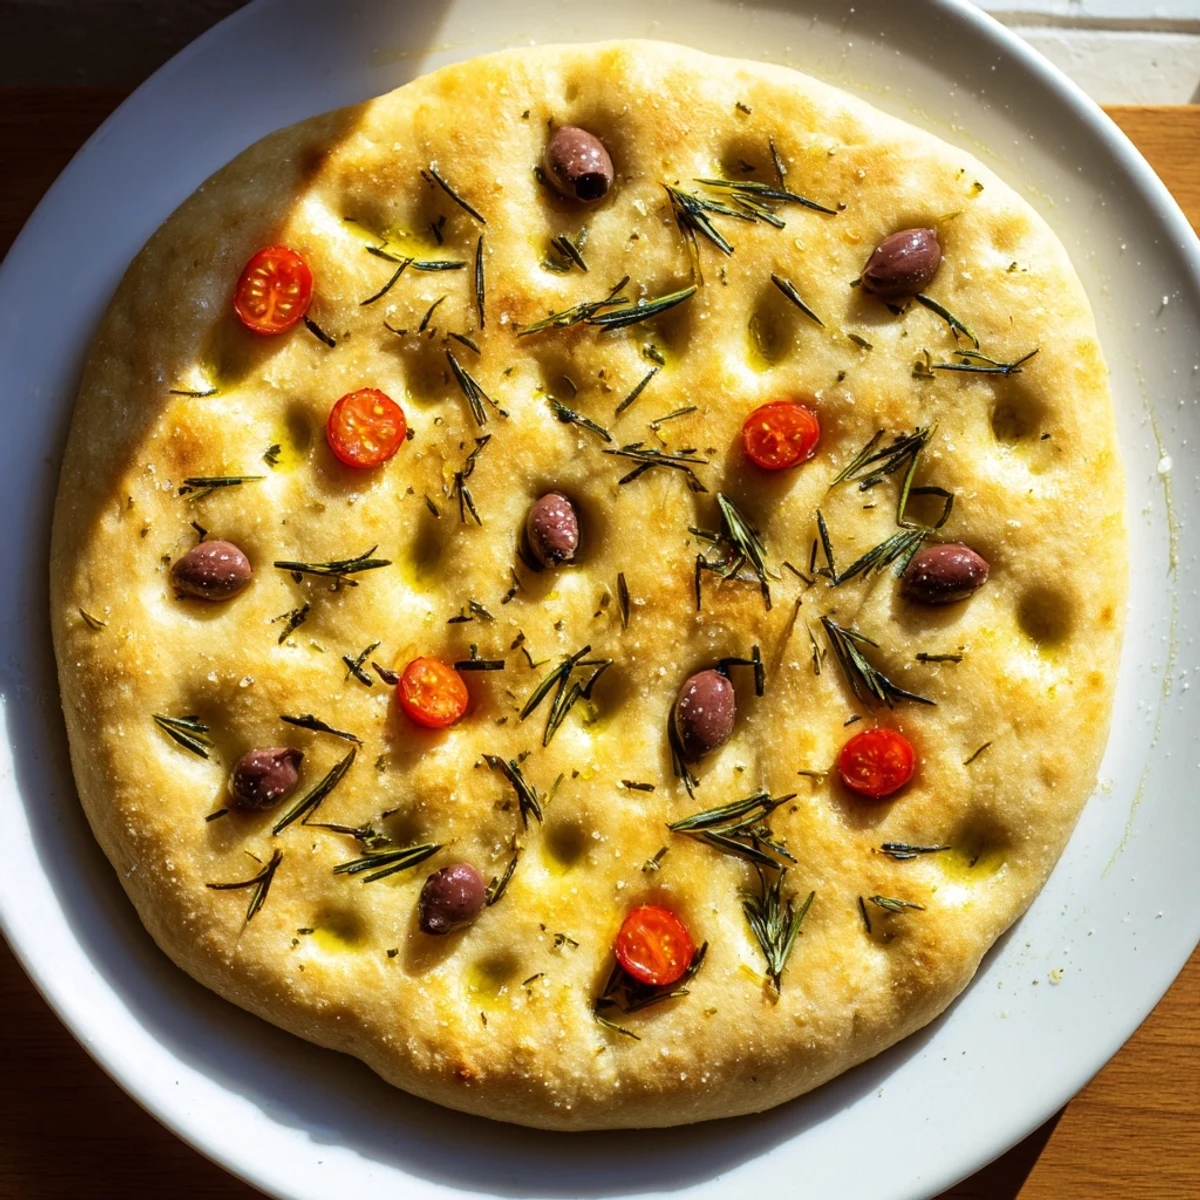
 This classic Italian focaccia delivers the perfect combination of textures—crisp and golden on the outside, irresistibly soft and airy within. The traditional topping of extra virgin olive oil, fragrant rosemary, and flaky sea salt creates that unmistakable Mediterranean flavor profile.
The straightforward technique requires just 20 minutes of active preparation, followed by a relaxing rise time. The signature dimpled surface, created by pressing your fingertips into the dough, captures pools of seasoned olive oil that bake into savory, crispy pockets.
Ideal served warm alongside soups and salads, used as a sandwich base, or simply enjoyed plain with a drizzle of quality olive oil. This versatile bread freezes beautifully and reheats to maintain its original texture.
The sound of dough slapping against the counter on a rainy Saturday morning is something I never get tired of. My neighbor Luca, who grew up near Genoa, once told me that focaccia is not bread, it is a feeling. I laughed at the time, but after making it every weekend for three months straight, I finally understood what he meant. The first bite of something you pulled golden and fragrant from your own oven changes you quietly.
I baked a tray of this for a park picnic last spring and watched six adults ignore an elaborate charcuterie board just to tear off warm, salty pieces with their hands. There is something about the rosemary and olive oil aroma that makes people forget about plates entirely. That afternoon convinced me this recipe deserved a permanent spot in my kitchen rotation.
Ingredients
- Bread flour (500 g): The higher protein content is what gives focaccia its chew and structure, so do not substitute all purpose flour if you can help it.
- Salt (10 g): Salt strengthens the gluten network and balances the richness of the oil, and skimping here makes everything taste flat.
- Active dry yeast (7 g): Check the expiration date because dead yeast is the quickest way to a dense, sad flatbread nobody wants to eat.
- Lukewarm water (325 ml): Think warm bath temperature, not hot, since water above about 45 degrees Celsius will kill your yeast instantly.
- Extra virgin olive oil for dough (50 ml): This enriches the crumb and keeps it soft for days, so use the best oil you have.
- Sugar (1 tsp): Just enough to wake the yeast up and give it something to feed on during that first rise.
- Extra virgin olive oil for topping (2 tbsp): Pooled into the dimples, this creates those golden fried pockets on top that everyone fights over.
- Fresh rosemary, chopped (1 tbsp): Fresh is dramatically better here, but dried works in a pinch if you rub it between your palms to release the oils.
- Flaky sea salt (1 and a half tsp): The crunch of large salt crystals on top is non negotiable, so save the fine salt for the dough itself.
- Pitted olives or cherry tomatoes (optional, 10 to 12): Pressed gently into the dough, they add bursts of tangy flavor that make each piece a little different.
Instructions
- Wake up the yeast:
- Stir the yeast and sugar into the lukewarm water in a small bowl and let it sit undisturbed for about ten minutes until the surface looks creamy and bubbling. If nothing happens, your yeast is dead and you need to start over with a fresh packet.
- Bring the dough together:
- Combine the flour and salt in a large bowl, create a well in the center, and pour in the frothy yeast mixture along with the olive oil. Mix with your fingers or a wooden spoon until everything comes together into a sticky, shaggy mass that clings stubbornly to your hands.
- Knead until proud:
- Turn the dough onto a lightly floured surface and knead for eight to ten minutes, pushing it away with the heel of your palm and folding it back, until it transforms into something smooth, elastic, and alive under your hands. You will know it is ready when it springs back gently after you press it with a fingertip.
- Let it rise:
- Place the dough in an oiled bowl, cover it loosely with a damp kitchen towel, and leave it in a warm, draft free spot for about one hour. It should double in size and look puffy and relaxed when you peek underneath the towel.
- Shape and dimple:
- Grease your baking tray generously with olive oil, then gently press the risen dough into the tray, stretching it to fill the corners. Press your oiled fingertips deep into the dough at an angle to create those characteristic dimples across the entire surface.
- Add the toppings:
- Drizzle the olive oil liberally over the top so it pools in the dimples, then scatter the rosemary, sea salt, and any olives or tomatoes you are using. Try not to overthink the arrangement because rustic and uneven is exactly how it should look.
- The second rise:
- Preheat your oven to 220 degrees Celsius while the prepared dough rests on the tray for twenty to thirty minutes. It should look visibly puffed and slightly jiggly when you give the tray a gentle shake.
- Bake to golden perfection:
- Slide the tray into the hot oven and bake for twenty to twenty five minutes until the top is deeply golden and the edges are lightly browned and crisp. Your kitchen will smell incredible, and that is how you know you are on the right track.
- Cool and serve:
- Let the focaccia cool on the tray for about ten minutes so the crumb can set before you slice into it. Serve it warm or at room temperature, either on its own or alongside whatever you are pouring for dinner.
 Pin It
 The night I served this straight from the oven to a table of friends standing around my kitchen island, nobody said a word for a full five minutes. They just tore and ate and reached for more, oil glistening on their fingers, completely content. That silence was the highest compliment I have ever received as a home cook.
Adapting the Toppings to Your Mood
Sliced red onions pressed into the dough before baking turn sweet and jammy in the oven, and a handful of sun dried tomatoes adds a concentrated tang that pairs beautifully with the rosemary. Thyme, oregano, or even a pinch of zaatar can replace or complement the rosemary depending on what you are serving alongside it. Let whatever looks good at the market guide you, because focaccia is forgiving and rewards experimentation generously.
Getting the Texture Just Right
The biggest leap in my focaccia game came when I stopped being afraid of a wet, sticky dough and started trusting the process. A higher hydration dough feels unmanageable at first, but that moisture is what creates the big, beautiful air pockets inside. Oil your hands instead of adding more flour, and be patient during the kneading because the dough will eventually come together beautifully.
Serving, Storing, and Making It Last
Focaccia is at its absolute best within two hours of leaving the oven, but it stores remarkably well if you wrap it tightly and reheat gently. A dry cast iron skillet over medium heat for about a minute per side brings day old focaccia back to life with a crisp exterior and soft center.
- Freeze sliced portions between sheets of parchment paper in a sealed bag for up to three months.
- Day old focaccia makes an extraordinary sandwich base, especially with mozzarella, prosciutto, and a smear of pesto.
- Always bring it back to room temperature or warm it briefly before serving because cold focaccia loses its charm quickly.
 Pin It
 Once you have made focaccia from scratch a few times, it stops being a recipe and starts being a ritual you look forward to. Share it generously, because that is exactly what this bread was made for.
Recipe FAQs
- → What makes focaccia different from regular bread?
-
Focaccia features a higher olive oil content and thicker texture than typical breads. The characteristic dimpled surface creates crispy, flavorful pockets, while the interior remains exceptionally soft and airy. This Italian flatbread serves as both a standalone dish and versatile base for other ingredients.
- → Can I use all-purpose flour instead of bread flour?
-
Bread flour provides superior structure and chewiness due to its higher protein content. All-purpose flour will work but produces a slightly softer, less textured result. For best results, use bread flour or consider a 50-50 blend if bread flour is unavailable.
- → How do I know when the focaccia is properly risen?
-
The dough should double in size during the initial rise, typically taking about 60 minutes. Before baking, after the second 20-30 minute rest, the surface should appear puffy and hold your fingerprint indentations. The dough should feel light and airy rather than dense or resistant.
- → What variations can I add to the basic recipe?
-
Popular additions include thinly sliced red onions, sun-dried tomatoes, caramelized garlic, or fresh thyme instead of rosemary. Consider incorporating olives, cherry tomatoes, or even grated Parmesan. These additions work best when pressed gently into the dimpled dough before the final rise.
- → How should I store leftover focaccia?
-
Keep at room temperature wrapped in plastic or in an airtight container for up to 2 days. For longer storage, freeze whole or sliced pieces wrapped tightly in foil, then place in freezer bags. Reheat in a 180°C (350°F) oven for 5-8 minutes to restore crispiness.
- → Why is my focaccia too dense or heavy?
-
Dense results typically stem from insufficient rising time or under-kneading. Ensure the dough doubles during the first rise and becomes properly puffy before baking. Kneading for the full 8-10 minutes develops necessary gluten structure. Also verify your yeast is fresh and active—frothy appearance indicates proper activation.
